
Index of articles
Click open the Index headers below to browse FAQ
Our support articles address the most common issues we deal with “in the field” about Windows, Microsoft 365 Business, web server support, and web design. Click open the accordion sections below to look for self-serve help. Often, issues rely on a knowledge of IT concepts and language. Also, Microsoft, cPanel, and other software houses featured in these articles often update practice notes and procedures without notice. We review our pages regulalry, however you are advised to contact us for further help about these articles especially concerning issues around sovereign account identity and Multifactor Authentication (MFA).
Microsoft Windows 11
- Windows Pro or Windows Home? A Practical Guide for Business Owners
- Windows Restart vs Shut Down, and Daily Power Management
- Laptop Battery Health: Tips to Prolong Your Battery’s Lifespan
- Windows 11 System Restore: How to Create and Manage Restore Points Safely
- Windows Recovery drive – why Microsoft recommends it
- PC recovery tools vs Windows Recovery
- Why BitLocker for Small Business Matters
- Why Small Businesses Struggle With Microsoft 365 on Windows Home PCs
- How to Set Up a New Windows PC to Sign In Directly with a Microsoft 365 Work Account
- Windows 11 Setup Guide: 1. How to Configure Your PC Securely with Microsoft Accounts
- Windows 11: Why One Microsoft Account Isn’t Enough for Home and Small Business Users
- Windows 11 Setup for Privacy-Focused Users: Why Microsoft 365 Business Matters
Microsoft 365 setup, licensing and user management
- How to Set Up Microsoft 365 for a Small Business
- Why Small Businesses Struggle With Microsoft 365 on Windows Home PCs
- Microsoft 365 Global Administrator: Why Business Continuity needs 2 global admins
- Microsoft 365 Global Administrator: Why You Need a Second Admin and How to Assign Roles
- How to Set Up a New Windows PC to Sign In Directly with a Microsoft 365 Work Account
- How to add a new employee with Microsoft 365 User Onboarding
- How to manage Microsoft 365 when an employee leaves
- Email System Audit and Recovery Review
- How to Set Up Microsoft Authenticator MFA for 365
- How to Back Up MFA Credentials with Microsoft Authenticator Backup
- Microsoft Authenticator iPhone backup
- Locked Out of Your Microsoft 365 Account? Here’s What to Do When MFA Recovery Fails
- What Is a Shared Mailbox in Microsoft 365 and Why Your Business Should Use One
- Change Microsoft 365/email password
- Change Office 365 credit/debit card information
- Why Switching PC Users to Microsoft 365 Sign-In Matters for Small Businesses
- How to Transition PC Users to Microsoft 365 Sign-In and Entra ID
- How to Use Microsoft 365 MailTips to Improve Email Performance
Microsoft 365, Exchange Online and Outlook
- How to Backup Microsoft 365 Outlook Email to a PST File
- How Outlook Categories Transform Email Management
- Microsoft 365: Outlook Categories
- How to Search by Category in Outlook
- How to Manage Microsoft 365 Email Signatures
- About Microsoft 365 Outlook templates
- What Is a Shared Mailbox in Microsoft 365 and Why Your Business Should Use One
- How to Use Microsoft 365 MailTips to Improve Email Performance
- How to Use Outlook Sweep to Declutter Your Outlook Inbox
- Email migration from cPanel to Microsoft 365
- How to Use Microsoft 365 Inline Email Archiving
- Create a Microsoft 365 Exchange Online connector
- 2025 Email Security Guide for Business Owners: Avoiding Scams and Attacks
Microsoft 365 configuration and user tips and tricks
- Why Professional IT Support Still Matters in the Age of AI
- How to Use Folder Color Coding in Microsoft 365 to Boost Productivity
- How to Set Up a Microsoft 365 SharePoint Site for a Small Business
- OneNote Sync Troubleshooting
- Create a Microsoft 365 Exchange Online connector
- Configure SPF, rDNS, DKIM, and DMARC for email
The following articles can be found using <Search> or scrolling through our list of articles. Procedures may have changed since and therefore this content is either being eidted or deprecated. So, although we are editing this content, you might still find useful information to help with issues.
- – Exchange Online – room and equipment resources
- – Reset Office 365 password expiration policy
- – Exchange Email – EOP antivirus/spam
- – Exchange Online Protection – EOP
- – Microsoft 365 Exchange Email – data leakage & loss protection
- – Microsoft ActiveSync
cPanel - web server | email |DNS
- How to Change Your Email Password in Roundcube Webmail
- How cPanel Spam Filters Work
- What Is cPanel BoxTrapper And Why Email Users Should Care
- Email Management in cPanel: Save Space, Cut Costs, and Go Green
- 2025 Email Security Guide for Business Owners: Avoiding Scams and Attacks
- Email System Audit and Recovery Review
- Safeguard your .uk domain names – Nominet
- Email migration from cPanel to Microsoft 365
- How to manage a web site contact form
- How to configure DNS for a contact form
- Configure SPF, rDNS, DKIM, and DMARC for email
- Create a new email address with cPanel
- How to use cPanel Web Disk
- cPanel Disaster Recovery Backups: Ownership responsibility
- How to back up your web server with cPanel
- cPanel WordPress Backup: A Practical Guide for Virtual Host Owners
- Add SPF to your DNS zone record
- Configure DMARC using cPanel
- Configure DKIM in cPanel
- Configure Reverse DNS (RDNS)
- cPanel email account considerations
- Why Authoritative Nameservers Matter for Your Web Hosting Setup

cPanel Disaster Recovery Backups: Ownership responsibility
cPanel Disaster Recovery Backups: your data is yours to protect
Comstat maintains disaster recovery backups for your web server content and data strictly for our own administrative and disaster recovery purposes. This article sets out our backup policy which, in common with industry convention, relies on the principle that responsibility for data protection rests with the owner of the virtual server or hosting account.
This article explains how our disaster recovery backups are used within our hosting and virtual server environments — and just as importantly, how they are not used.
Click open the headers below to learn more about our policy regarding disaster recovery backups. Support options are available for professional assistance, and at the end of the article you can find links to guidance and help for implementing backups. You can return to our Index of Articles by clicking here.
Data is the responsibility of the owner
In all hosting environments managed by Comstat, the responsibility for data protection rests with the owner of the virtual server or hosting account.
That includes, but is not limited to:
- Website content and uploads
- Databases
- Email data
- Application‑specific files
- Configuration changes made by the account holder
This is in line with Internet Service Provider (ISP) practice. For instance, neither Google nor Outlook.com undertake to back up your email or files. Although Microsoft 365 guarantees service level availability, data remains the responsibility of the owner.
Every website owner should maintain their own backup strategy that aligns with their business, regulatory, and operational needs. This may include one or more of these approaches:
- cPanel backup (provided with your server)
- Backup utilities like Backuply which you can install using WordPress or cPanel Softaculous library
- off‑platform backups
- third‑party backup services
- or application‑level backup tools
We are glad to help you decide what is the best solution for your needs.
Importantly, although we do keep temporary backups which may be helpful as a last resort, our platform is not positioned as a primary backup service for end users.
Who Is Responsible for Data?
Responsibility for data protection rests with the owner of the virtual server or hosting account. In the case of the services we provide to you, this includes but is not limited to:
- Website content and uploads
- Databases
- Email data
- Application‑specific files
- Configuration changes made by the account holder
Every website owner should maintain their own backup strategy. This makes sense because your strategy needs to align with your business, regulatory, and operational needs. This might include using:
- solutions available to you with your hosting (e.g. Backuply, Softaculous WordPress Manager)
- solutions provided to you by agreement with your agents
- off‑platform backups
- third‑party backup services
- application‑level backup tools
Our data recovery backups are designed to cope with force majeure risks that your hardware is exposed to. Therefore, our platform is not positioned as a primary backup service for end users.
Why Comstat Takes Backups at All
Although responsibility for content and data ownership lies with an account holder, Comstat performs disaster recovery backups for clear and limited reasons:
- Platform‑level disaster recovery
- Server migration
- Administrative resilience
- Infrastructure failure scenarios
- Major security incidents
In this way, our backup regime exists to protect the integrity of the hosting platform as a whole, not to replace user‑managed backup solutions.
Our backup framework is designed to support hardware management and recovery in exceptional circumstances—not routine file restoration or historical data retrieval.
How Our Backup Policy Works
Unfortunately, web site owners do not always deal with backups. In this situation, our operational backups might be able to restore a recent working configuration. However, this might not accomplish a most recent known working configuration. Also, our backup library extends to a 90-day rolling window.
Backup Scope
- Full cPanel account backups
- Incremental – file changes made since baseline/last increment
- No guarantee of granular file‑level recovery
- No long‑term archival storage
- System files are excluded
Retention Model
- Daily backups: retained for 7 days
- Weekly backups: retained for 4 weeks
- Monthly backups: retained for 3 months
This schedule provides a maximum recovery window of approximately 90 days, which is appropriate for disaster recovery while avoiding unnecessary data retention.
Backup Access
- Backups are governed using native WHM and cPanel tools
- Restore actions are typically administrator‑controlled
- In some cases, backups may be visible to account holders in cPanel
- Access is provided only as a last resort, not as a service guarantee
This model ensures that cPanel disaster recovery backups remain predictable, auditable, and aligned with platform boundaries.
Why We Use Native WHM Backups
Firstly, it helps to understand how a web server operates.
WHM – Web Host Manager
Web server (platform) administrators use an operating system called WHM (Web Host Manager) to manage servers. Think of WHM as an equivalent of Microsoft Windows (admin user). Usually, web site owners do not have access to this hierarchy level. This is because WHM requires specialist knowledge
cPanel – where daily work happens
Web site owners typically use cPanel (Windows standard user) to manage their web site, email, etc.cPanel provides a broad toolset to deal with web sites, email, file management, and many other end-user features. Like a Windows (standard) user, cPanel users have daily control of the web server for email, WordPress, and other features. However, some functions are omitted because they are not likely to be needed, and pose elevated security or operational risk.
How our backup policy fits
We operate backups at WHM level. These backups are executed by a WHM admin account which is not available to the web site owner. Using WHM’s built‑in backup utilities offers several advantages, but some limitations, too:
- Tight integration with cPanel account structure
- Correct handling of permissions and metadata
- Well‑tested restore paths during emergencies
- Clear separation between platform and user responsibility
Custom or script‑based backup systems can introduce ambiguity, complexity, and increased operational risk. For disaster recovery, reliability and predictability matter more than flexibility. This also means that because our backups are executed at an “admin” level, restoration of data usually requires adjustment to ownership and read/write permissions. This is why owner-operated backups work more efficiently. Also, restoration from our WHM environment entails cost.
What This Means for Website Owners
In practical terms:
- You must maintain your own backups
- You should not rely on platform backups for routine “restores”
- Platform backups may help in exceptional circumstances
- No backup availability is guaranteed beyond the defined retention window
This approach keeps expectations clear and ensures that responsibility is properly aligned.
Summary - Next Steps
If you have questions about suitable backup strategies for your workload, we are always happy to discuss best practices. Backup utilities are already available to you at cPanel level, including Backup for cPanel which allows you to download and store your site in a backup file. WordPress can be backed up using plugins like Backuply, and your installation can also be backed up using Softaculous WordPress Manager. This is available on your server too. Lastly, we publish articles about options like:
- How to back up your web server with cPanel
- cPanel WordPress Backup: A Practical Guide for Virtual Host Owners
We continually introduce new content to our support section, so please do check our How To pages periodically.
Bear in mind that different solutions have their own merits. For instance, Softaculous WordPress Manager is great for ease of use. If you want to export your WordPress website to a new server, though, it is not a viable option. For that eventuality the second article in the list above is desirable. Admittedly, this approach is seemingly daunting, and you may need to contact us about this methodology. So, when you plan a backup strategy, you should define what the backups need to accomplish.
Remember, ownership of the data remains exactly where it should be: with you.
If you need help adopting this workflow, or you need disaster recovery planning or assistance, please get in touch, or use our contact page to organize an appointment which suits your timetable. You can return to our Index of Articles by clicking here .

Email System Audit and Recovery Review: What It Includes and Why It Matters
What Is an Email System Audit and Recovery Review?
An email system audit and recovery review is a structured assessment of your company’s email environment. It examines how your system is configured, how secure it is, and how well it can recover from failure or attack.
Most modern businesses rely on platforms such as Microsoft 365. These systems are powerful, but they are also complex. Over time, settings drift, risks increase, and gaps appear. An audit brings clarity.
A proper email system audit and recovery review answers three key questions:
- Is the system secure?
- Is it configured correctly?
- Can it recover quickly if something goes wrong?
Click open the headers below to learn more about how a professional email system audit helps meet IT compliance standards. Support options are available for professional assistance. You can return to our Index of Articles by clicking here.
What Does an Email System Audit Cover?
An email system audit and recovery review focuses on several core areas. Each one plays a role in protecting your business.
Security and Access
This aspect of an email system audit includes checks on:
- Multi-factor authentication (MFA)
- Admin permissions and access levels
- Legacy protocols such as IMAP or POP
- Conditional access policies
The goal is to reduce the risk of account compromise, which is one of the most common entry points for attackers.
Mail Flow and Protection
At this stage of an email system audit we review how email enters and leaves your system:
- SPF, DKIM, and DMARC records
- Anti-spoofing protection
- Anti-phishing and malware filtering
- A well-configured system stops threats before they reach users.
Mailbox and Data Configuration
As your email system audit progresses, the focus of this exercise deals with how data is stored and managed:
- Mailbox permissions and shared access
- Retention policies
- Archiving and audit logging
Often, businesses discover that data is either not protected enough, or kept longer than needed.
What Is a Recovery Review?
While the audit looks at your current state, the recovery element looks at your future resilience.
A strong email system audit and recovery review will assess:
Backup and Restore Capability
Microsoft 365 includes retention, but it is not a full backup solution. Other email systems make no provision for retention or broader backups at all. A review checks:
- Whether backups exist
- How quickly data can be restored
- How granular recovery is (single emails vs full mailboxes)
Incident Response Readiness
If an account is compromised, speed matters. The review looks at whether you can:
- Revoke sessions quickly
- Reset access securely
- Remove malicious rules or forwarding
Business Continuity
- You should also know what happens if:
- DNS settings fail
- A widespread outage occurs
Few organisations have a good understanding of these areas.
Why This Matters for Modern Businesses
Email is still the backbone of business communication. It is also a primary attack vector. A thorough email system audit and recovery review helps to:
- Reduce the risk of phishing and account takeover
- Protect sensitive client data
- Protect sensitive client data
- Improve compliance and record keeping
- Provide confidence for directors and stakeholders
In many cases, it also highlights unused features within your existing licensing—especially in Microsoft 365—that can improve security without increasing cost.
A Practical Approach: Audit in Stages
Many assume an audit must be a large, one-off exercise. In reality, a staged approach is often more effective.
An email system audit and recovery review can be delivered in phases:
Phase 1: Security Baseline
- Address critical risks such as MFA, admin access, and mail spoofing.
Phase 2: Configuration and Data
- Review policies, permissions, and retention settings.
Phase 3: Recovery and Resilience
- Assess backup, monitoring, and incident response processes.
This staged model allows work to be budgeted and managed over time. It also reflects how systems evolve, rather than treating the audit as a fixed snapshot.
A useful comparison is financial accounting. Accounts show a position at a moment in time. By contrast, an email system audit and recovery review can act as an ongoing process, adapting as your business grows and risks change.
What You Should Expect from an Audit
A professional email system audit and recovery review should deliver:
- A clear findings report
- Risk ratings (critical, high, medium, low)
- Plain English explanations
- A prioritised action plan
The aim is not just to highlight issues, but to give practical steps that improve your system.
Summary
An email system audit and recovery review is not just a technical exercise. It is a way to protect your operations, your data, and your reputation.
Handled correctly, a dsicipline like this provides both immediate improvements and a long-term roadmap. Whether delivered in one piece or in stages, it helps ensure your email system is secure, resilient, and fit for purpose.
Comstat provides independent advice on business IT choices that reduce risk, protect continuity, and support long‑term growth. If you need help managhing email, please get in touch, or use our contact page to organize an appointment which suits your timetable. You can return to our Index of Articles by clicking here .

cPanel WordPress Backup: A Practical Guide for Virtual Host Owners
Introduction
If you manage your own virtual host, you need a cPanel WordPress backup strategy. While you can configure cPanel a few ways to automate backups, the truth is that using cPanel Terminal or SSH is more comprehensive. It also affords maximum flexibility when restoring content.
For instance, Softaculous and other third party backup utilities impose attributes during backup/export that can obstruct access to files during restoration.
Instead, cPanel’s CLI (Command Line Interface) provides means to rename directory/file ownership and avoid WordPress ID codes that can render backups unusable. This guide shows you how to back up and restore your WordPress site, database, and (optionally) email quickly and reliably.
Important: this article gives an overview of a backup procedure assuming conventional configurations. You may need to tailor this workflow according to your virtual host’s LAMP, PHP, WordPress (or nested WordPress), and MySQL versions. If in doubt, you should contact us especially for production web sites for professional help.
Click open the headers below to learn more about using simple command line instructions to secure maximum flexibility for data restoration. Support options are available for professional assistance. You can return to our Index of Articles by clicking here.
What You Need Before You Start
To follow this cPanel WordPress backup workflow, you will need:
- SSH access to your server
- Your cPanel username and password credentials
- Basic command-line familiarity
- Permission to run backup commands
You may need to contact us for SSH access. SSH is usually restricted for improved security, and we are happy to enable it should you want SSH on an ongoing basis.
Step 1: Back Up WordPress Files
Your WordPress site lives in the public_html directory in your server’s home directory. Use this command to create a compressed archive:
tar -czf /home/username/public_html.tar.gz -C /home/username public_html
This creates a clean file backup that includes:
- Themes
- Plugins
- Media uploads
- Configuration files
This is the first part of your cPanel WordPress backup process.
Step 2: Back Up your WordPress Database
WordPress stores your web site’s content in a MySQL database. Credentials for your database are stored “server side” in a WordPress file called wp-config.php. You can open this file with a text editor to make a note of these credentials:
- DB name
- DB user
- DB password
Next, using your SSH command line, run this command:
mysqldump -u dbuser -p dbname > /home/username/database.sql
This database dump contains:
- Posts and pages
- Users
- Site settings
You can alternately export the database using phpMyAdmin. This is another efficient option, and it is secure because the database “dump” is downloaded to your local workstation.
Step 3 (OPTIONAL) Back Up Email
Email is stored separately from your website. Usually, email is handled via Microsoft 365, Gmail, or another email service. If you manage email via your web server, though, you need to back up your email. To capture this content use:
tar -czf /home/username/email.tar.gz -C /home/username mail etc
This captures:
- Mailboxes and messages
- Email account configuration
You can back up all accounts at once or target individual mailboxes if needed.
Step 4: Store Your Backups Safely
Once created, download your backups or move them to a safe location. For example:
scp username@server:/home/username/*.tar.gz ./
This command copies files from the server to your local machine. You can use cPanel File Explorer to do the same thing. Sometimes, using a mouse is a more familiar way to deal with files. Either way, keeping copies off the server ensures you can recover even if the original host fails.
Restoring your WordPress site
There are a few reasons backups are useful:
- you want to restore a last known working condition
- you want to migrate your web site to a new web server
- you may need to re-house your web site using a different domain name
Using Linux commands using cPanel’s SSH access is the only way to allow these eventualities to happen.
Restore your WordPress site
This cPanel WordPress backup workflow makes recovery simple. If you are restoring files to your existing server, skip to step 2.
- Recreate the cPanel Account
- Set up a new account with the same username if possible.
- Restore WordPress Themes/Plugins/Admin files
- tar -xzf public_html.tar.gz -C /home/username
- Restore Database
- mysql -u dbuser -p dbname < database.sql
- Fix Permissions
- chown -R username:username /home/username/public_html
- Check configuration
- Ensure wp-config.php matches the database details.
Restore email (optional)
If you included email in your cPanel backup WordPress process:
- Recreate email accounts in cPanel
- Restore files:
- tar -xzf email.tar.gz -C /home/username
- Reset permissions:
- chown -R username:mail /home/username/mail
Mail clients should then resynchronise automatically.
Why This Method Works Well
There are a few ways to backup a WordPress installation. Most methods become problematic because of limitations that backup utilities offer. Sometimes, this is to suit a limited purpose in the first place. This cPanel WordPress backup approach gives you:
- Independence from cPanel restore tools
- Fast, lightweight backups
- Full control over restoration
- including file naming
- ignoring WordPress ID codes that might prohibit import
- renaming and credentialling WordPress databases
- Clean rebuilds without legacy issues
Summary
A manual cPanel WordPress backup workflow using SSH is simple, reliable, and efficient. It suits users who want clarity and control during migrations or recovery.
Used alongside standard cPanel tools, our cPanel WordPress backup workflow gives you both flexibility and peace of mind.
If you need help adopting this workflow, or you need disaster recovery planning or assistance, please get in touch, or use our contact page to organize an appointment which suits your timetable. You can return to our Index of Articles by clicking here .
Business PC Recovery Tools Explained: Windows Recovery Drive vs Manufacturer Tools
Plan for recovery
Managing your IT at workstation or even network level is about preparing for failure, rather than waiting for a problem. PC recovery tools play an important part in ongoing hardware management.
When business owners and professionals choose a laptop, the conversation usually starts and ends with price. A £250 generic Windows laptop appears to do the same job as an £800 business‑grade device. Both run Windows. Both open email. Both connect to the cloud. However, although the price looks great, the reality does not hit until the computer develops a problem. Suddenly, PC recovery tools that could remedy a problem are note available to cinch an issue.
The difference only becomes Windows or hardware problems happen. In conventional offices, ‘work” computers tend to work with finite core applications only. Home office computers do not enjoy this discipline: a user often uses a computer for recreational and social functions that would not be tolerated in an office network. This makes home office computers more difficult to diagnose and remedy. So, recovery tools SHOULD be a prime consideration when buying a computer for home/small office use.
While Windowes provides recovery tools to look after itself, inexpensive generic computers do not usually provide manufacturer hardware diagnostics and recovery available to business class hardware.
Business PC recovery tools exist for:
- failed updates
- storage errors
- firmware problems
- full operating system corruption.
Understanding how these tools work—and why higher‑quality systems manage failure better—can significantly reduce downtime, data loss, and support costs.
Click open the headers below to learn more about how Manufacturer hardware recovery tools work with Windows Recovery to provide the best capability for restoring PC faults. Support options are available for professional assistance. You can return to our Index of Articles by clicking here.
How the Windows Recovery Drive Helps Recover Windows
The Windows Recovery Drive is a Microsoft‑provided safety net. Created using a USB stick, it contains the Windows Recovery Environment (WinRE), which can be used when Windows will not start.
At a basic level, Windows recovery tools allow you to:
- Repair startup issues
- Roll back recent updates
- Reset Windows while keeping or removing user files
- Access advanced tools such as Command Prompt for manual repair
For many home users, this is sufficient. Windows recovery is generic by design. It is meant to work on almost any compatible PC regardless of manufacturer.
However, that strength is also its limitation. Windows recovery focuses solely on the operating system. It does not deeply understand the hardware it runs on, nor does it diagnose whether Windows failed because the hardware itself is deteriorating.
The Limits of Windows‑Only Recovery
When a system will not boot, Windows Recovery (see our article here) assumes that:
- The storage device is healthy
- Firmware is intact
- Drivers can be reapplied later
- Hardware faults are unlikely
In a business environment, or in circumstances where users provide consultative or professional/advisory work, these assumptions are optimistic. Instead, in keeping with professionally managed network, it should be anticipated that IT will fail and plan for the eventuality.
If a failing SSD (hard disk drive), memory error, or firmware issue is the cause of the failure, Windows recovery may repeatedly reinstall an operating system that cannot remain stable. This leads to extended downtime and escalating support effort.
This is where manufacturer PC recovery tools from the become important. This kind of utility wraps around Windows Recovery, and apart from providing early warnings for hardware failure, these kinds of utilities are often capable of reinstalling the manufacturer’s OEM version of Windows. This is useful in situations where Windows might have been optimized for the computer’s hardware performance.
Manufacturer Recovery Tools: Beyond Windows Recovery
Major PC manufacturers add their own recovery layers on top of Windows. Manufacturer tools are tightly integrated with firmware, drivers, and hardware diagnostics.
Suppliers like Acer, Asus, Dell, Lenovo, and other mature brands supply spohisticated diagnostics, early warning, and recovery tools for computers which start in intermedate price ranges and above. Availability varies on specifications so do check before buying,
For the purposes of this article we will refer to Dell’s SupportAssist OS Recovery. Dell’s bundle operates similarly to other major manufacturer solutions.
What Manufacturer Recovery Tools Typically Provide
Manufacturer or PC recovery tools like Dell SupportAssist OS Recovery typically feature:
- Pre‑boot hardware diagnostics to test storage, memory, CPU, and motherboard
- OEM‑aware Windows repair that understands the exact device model
- Data backup tools before reinstallation
- Factory image restore matched to the device
- Firmware‑level recovery when disks or partitions are damaged
These utilities are beyond Windows Recovery capability. Manufacturer PC recovery tools operate outside Windows and, in some cases, partially inside the computer’s own system firmware. This allows recovery to begin even when Windows is completely unusable. In the right hands, this software can recover computers that might be otherwise determined to be unviable to repair.
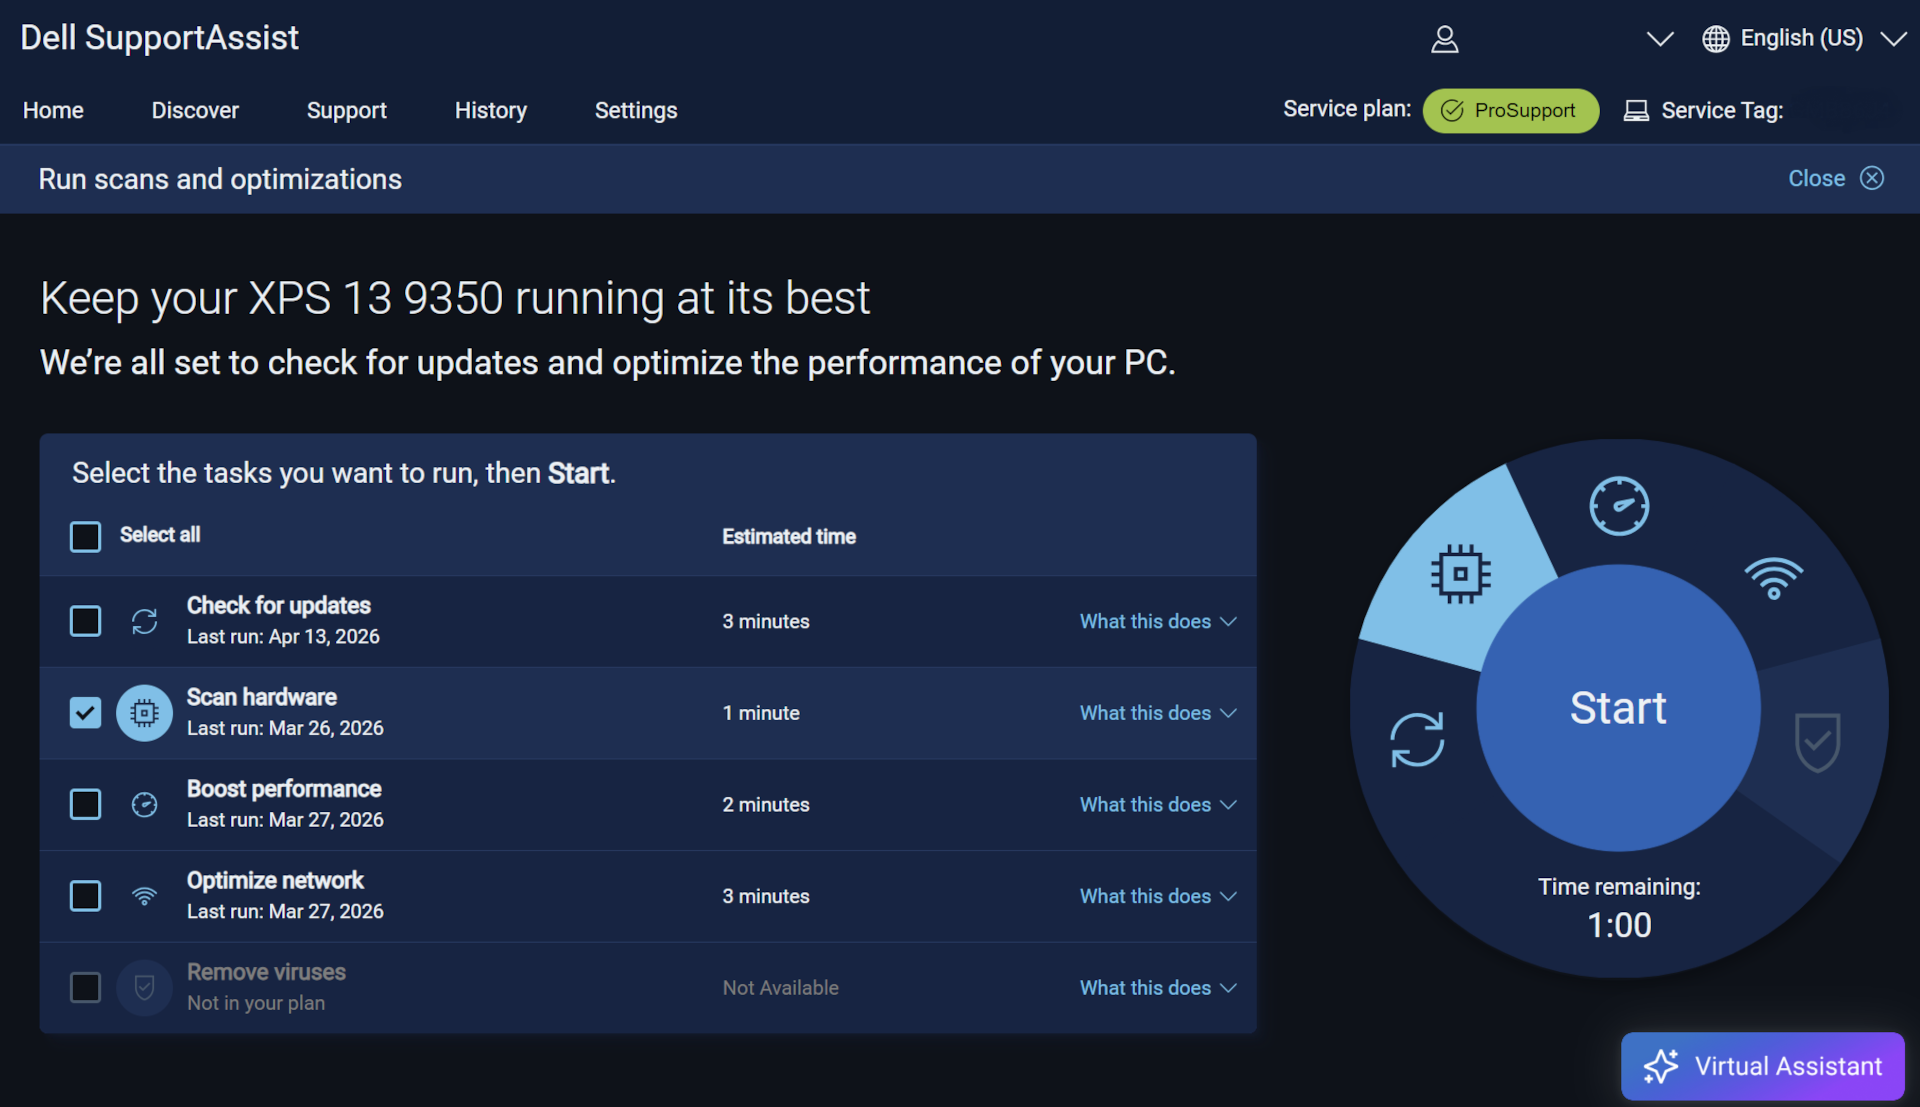
Manufacturers provide utilities like Dell’s SupportAssist OS Recovery which practively monitor performance and provide recovery tools not available in Microsoft Recovery Drive.
Why This Matters for Professional Users
From a cost perspective, the difference rarely shows up on day one. It appears later, when a device fails during a critical work period.
Without strong business PC recovery tools:
- Diagnosis takes longer
- Data recovery is riskier
- Rebuilds become manual and error‑prone
- Support costs rise quickly
With manufacturer PC recovery tools in place:
- Hardware faults are identified early
- Recovery paths are clearer
- Downtime is measured in hours, not days
- Devices can often be restored remotely or with minimal intervention
What looks like a £550 saving at purchase can easily become a £1,000 loss during a single serious failure.
The Strategic Difference Between Generic and Business‑Grade PCs
The real difference between a £250 laptop and an £800 business‑grade device is not performance. It is survivability.
Business‑grade systems are designed with the expectation that:
- Failures should be expected
- Mission critical devices must be recovered quickly
- Data must be protected
- Support needs to scale
These expectations are embodied in better business PC recovery tools for professional-level equipment, not just stronger materials or better keyboards.
Summary
Microsoft Windows’ Recovery Drive remains useful and should still be part of a basic disaster‑recovery plan. However, it is only one part of a comprehensive disaster recovery approach.
Manufacturer PC recovery tools—such as Dell SupportAssist OS Recovery—wrap around Windows recovery to provide diagnostics, data protection, and device‑specific restoration that Windows alone cannot offer.
For businesses, or users who rely on their computer for time-constrained productivity, choosing devices with strong recovery ecosystems is not a luxury. It is a practical investment in continuity, resilience, and predictable support costs.
If you are managing systems for the long term, recovery capability matters just as much as processor speed or storage size.
Comstat provides independent advice on business IT choices that reduce risk, protect continuity, and support long‑term growth. If you need help configuring email, please get in touch, or use our contact page to organize an appointment which suits your timetable. You can return to our Index of Articles by clicking here .
Why Professional IT Support Still Matters in the Age of AI
AI Helps — But It Does Not Replace Professional IT Support
Artificial intelligence (AI) has become a useful tool in homes and small offices. It can answer questions, suggest fixes, and help diagnose problems. But AI does replace professional IT support, because small‑business systems are complex. They involve networks, security, backups, mobile devices, shared data, cloud services, and more. These parts work together, and a wrong change in one area often creates new problems somewhere else.
AI is excellent at offering general guidance. It gives ideas and helps people learn. However it answers only the question it is asked. IT problems are often nuanced and an evident problem may be grounded in an unexpected cause. So, most DIY attempts fail because the real problem was not the one AI was asked to fix. When the wrong question is asked, the answer—no matter how clever—cannot solve the issue. That is where professional IT support makes the difference.
Click open the headers below to learn more about how expert guidance still matters in IT management..
You can return to our Index of Articles by clicking here.
AI Does Not Replace Human Oversight
You would not fly a plane without a pilot
If you tried to fly a commercial airliner by yourself with AI to guide you, it wouldn’t end well. Nobody would feel safe flying a commercial aircraft without a trained captain. Any one system can be easily understood. However all systems work in tandem. This needs nuanced understanding because managing the integrated whole is complex, and the consequences of mistakes are too serious. So, even with autopilot and advanced onboard computers, airlines still rely on skilled pilots for oversight.
Business networks are similarly complex. While livers might not be at stake, the income that a business owner derives from a computer network might be the means with a livelihood depends. A network with 35 connected devices – not unusual in today’s world – may include laptops, phones, IoT devices, printers, routers, switches, cloud services, and security tools. One wrong “fix” can disable access, expose data, or break something else that worked perfectly before. This is why professional IT support remains essential.
Would you repair your own car engine using AI?
Most drivers today cannot repair a modern car. The engine uses an array of sensors, electronics, and software. AI can help diagnose a possible fault. You might use AI to find pointers that might save an engineer diagnosis time on the workshop floor, but you would still take the car to your trained mechanic to fix it. Changing a brake pad yourself when the actual problem was a faulty ABS sensor might cause a fatal accident.
The same is true for IT. AI might suggest a setting to check, but it cannot look at logs or understand your computer setup (even something as simple as the difference between Windows Personal or Windows Professional). Nor can it anticipate your broader context within a network, or foresee the side‑effects of a change. Only someone who already knows your systems, your history, and your business can do that.
Root Cause: A Cached Notebook Structure on Android
OneNote Mobile caches each notebook’s structure when it is first opened. It continues to use that cached structure until the app is forced to refresh it. Even when new sections are added on desktop or web, Android may not notice new sections unless the OneNote cache on the Android handset is fully cleared.
In this case, the “Charlie’s Notebook” entry was an old OneDrive notebook created years earlier when the user first setup OneNote. Android had continued treating it as the default notebook. The result was:
- Quick Notes were sent to the wrong notebook
- New sections like 2026 never appeared
- Notebook colours stayed out of date
- Recent Notes showed pages from two different notebooks
All of this pointed toward a stale cached notebook that needed a proper reset.
The Hidden Cost of DIY Fixes
Small businesses often try to fix their own IT problems to save money. Unfortunately, DIY fixes tend to compound issues with unforeseen problems. One change leads to another, and by the time professional help is called, the recovery work is more difficult—and more expensive—than the original issue ever was.
Example – “my email does not work”.
We often deal with email problems. Often, we are asked to fix a computer because email does not work. The client has spent time trying to diagnose ApplMail or Outlook. However, in the example most recently dealt with, the client had note renewed a domain name. For whatever reason, AI did not detect this. The problem had nothing to do with the owner’s computer, and some days of email were lost (and time) because the problem was elsewhere.
AI does not always help
This is why many small businesses end up needing professional IT support more than ever, not less. AI has encouraged people to try more fixes, but these attempts are often made without understanding the underlying cause of the problem.
Solution – IT professionals solve problems
We do not offer ad-hoc support. Instead, we audit your network and needs firstg to establish benchmarks the benchmarks we rely on to plan ongoing support and deal with issues as they inevitably develop. IT constantly develops, and unfortunately this brings problems that nobody can anticipate. Disciplined planning and management helps to build a reliable network.
Our experience with field work since the beginning of 2025 underscores this. We have been asked to remedy more problems than ever before, and usually problems are exacerbated by unfortunate fixes that addressed the wrong issue.
What Professional IT Support Delivers That AI Cannot
- Considered and contextual diagnosis, not guesswork
- AI answers your question. An IT professional identifies the actual problem
- Preventative care
- Professionals maintain systems proactively, reducing faults before they appear
- Security with accountability
- Incorrect settings can expose data. AI does not take responsibility for outcomes
- System‑wide insight
- Fixing one device can affect every other device. Only human oversight can manage these relationships safely
- Business continuity
- Downtime costs money. Professional IT support reduces the risk of outages and speeds recovery when issues arise
Professional IT support ensures that your network runs smoothly, safely, and with confidence. If you would like help exploring support options, feel free to get in touch, or use out contact page to organize an appointment which suits your timetable. You can return to our Index of Articles by clicking here.
Summary
The important point here is that when a notebook has changed significantly on OneNote desktop or Web, Android and Apple may need a full cache reset to see the updated structure.
This problem is not uncommon. Unfortunately, users often shrug their shoulders when this kind of sync fails and OneNote loses its utility as. Not unreasonably, users are not sure where to look for the problem or even what the problem is. Happily, functionality is easily fixed and this article should help you understand that OneNote caches on mobile devices can be easily remedied.
If you would like help exploring OneNote features implementing OneNote across devices, feel free to get in touch, or use out contact page to organize an appointment which suits your timetable. You can return to our Index of Articles by clicking here.
How to Search by Category in Outlook (Using Favourites & Search Folders)
Using Categories to search for emails
Searching your email by category is a fast way to stay organised, especially for volume email users and if you rely on colour‑coded workflows. Outlook now offers two reliable ways to do this. The simplest method uses categories which you have saved as favourites in your Outlook folder pane.
For more complex needs, Search Folders still offer the most control. This guide shows Microsoft’s recommended approaches and explains what currently works on Windows, web, and Mac.
Hot Tip!! This guidance is written for “New” Outlook. Outlook Classic is scheduled for deprecation in the medium term.
Click open the headers below to learn more about how you can use categories to simplify your searches in Outlook. You can jump to associated articles about Outlook Categories here:
You can return to our Index of Articles by clicking here.
1. The fastest method: using favourited categories in New Outlook
If your goal is simply to search by category in Outlook, the quickest method is to favourite the categories you use most.
How it works
When you favourite a category, it appears in the left‑hand folder pane. Selecting a favourited category instantly filters your mailbox to show every message tagged with that category. It behaves like a dynamic “saved search” without requiring any setup.
Why use this method?
- Instant filtering without typing a query
- Always up to date as new mail arrives
- No Search Folder required
- Works in:
- New Outlook for Windows
- Outlook on the web
- New Outlook for Mac
Find out how to create Outlook Categories in this article.
2. When you need more: use Search Folders for complex searches
Favourited categories handle single‑category scenarios well. But if you need multi‑criteria filtering—for example:
- Category + specific sender
- Category + unread items
- Category + timeframe
- OR combinations (e.g., Category A or Category B)
…then a Search Folder is still the best solution.
What is a Search Folder?
A Search Folder is a virtual folder that stores criteria and updates in real time. It works like a reusable saved search. Although the new Outlook does not let users “save a search,” it does support Search Folders.
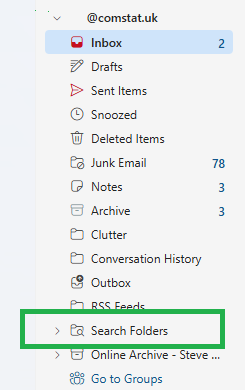
Outlook provides a saved searchesd folder in your folder pane to which you can add search folders.
Creating a Search Folder (New/Classic Outlook for DESKTOP)
- Right click on Saved Searches Folder → select New (or Add) Search Folder
- Choose a preset, or select Create a custom Search Folder
- Select Criteria to define filters such as:
- Category
- From:
- Subject
- Keywords
- Date
- Name the folder clearly (e.g., Finance, Categorised, 2026 invoices) and Save.
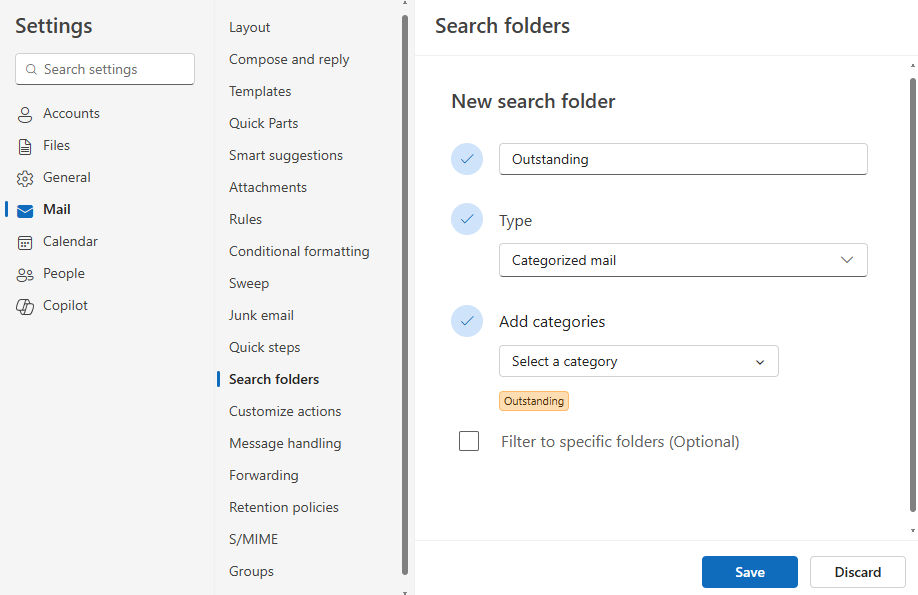
in this example, a category caslled “Outstanding” has been selected. More attributes can be added to filter your search further.
Add your saved search to Favourites
For extra convenience you can make your saved search a Favourite. This puts a shortcut towards the top of your folder pane near Inbox, Sent, etc. The folder still resides in your Saved Searches folder.
Outlook on the Web: mixed support
Outlook on the web supports Search Folders at the mailbox level, but it does not allow you to pin them to Favourites in the same way the Windows desktop app does.
Practical notes:
- Search Folders still work and remain visible
- You cannot favourite saved search folders
- For quick access, Microsoft recommends using favourited categories instead
If you need to reliably search by category in Outlook on the web, favouriting categories remains the simpler option.
New Outlook for Mac: saved searches exist, but pinning does not
At time of writing, Outlook for Mac allows users to create search queries and save them. However, adding saved searches or Search Folders to the Favourites pane is not supported. Drag‑and‑drop behaviour sometimes appears to work, but it is inconsistent and not officially documented.
Mac users who need fast access to tagged mail should rely on favourited categories until Microsoft expands this feature.
Practical tips for smoother workflows
- Use meaningful names
- For Search Folders, name them for purpose: e.g., Client Work – Categorised or Finance – Outstanding.
- Combine categories with other filters
- Ideal when you need more than a simple category filter.
- Keep the list clean
- Remove old Search Folders to reduce clutter.
- Use categories as your backbone
- Especially if your primary aim is to search by category in New Outlook
- Plan a taxonomy that can be managed over time
- planning a structure helps to reduce bloat and redundant categories. Also, a documented taxonomy helps colleagues who may need to duplicate categories – remember. categories operate at a user level, not an organisational level.
Summary
If you want to search by category in Outlook, the fastest and most widely supported method is simply to favourite your categories and use the dynamic filter. This works across Windows, web, and Mac.
For advanced filtering, Windows users can rely on Search Folders, which remain the best way to create a complex, reusable saved search. On the web and Mac, Search Folder support is more limited, so categories offer the most consistent experience.
If you need help or want advice about planning a category taxonomy, please get in touch, or use our contact page to organize an appointment which suits your timetable. You can return to our Index of Articles by clicking here.

How cPanel Spam Filters Work: Managing Email Protection with SpamAssassin and BoxTrapper
About cPanel Spam Filters
Email security matters more than ever, and cPanel users rely heavily on spam filters to keep inboxes clean. Understanding how cPanel spam filters work—and how to adjust them—helps ensure real messages get through while junk is blocked. In this guide, we’ll explain how spam filters evaluate email, how you can manage those settings in cPanel, and how SpamAssassin compares with cPanel’s stricter tool, BoxTrapper.
Apache SpamAssassin is the no. 1 Open Source anti-spam platform giving system administrators and users a filter to classify email and block spam (unsolicited bulk email).
Click open the headers below to learn more about how to enable and manage SpamAssassin and learn about the stricter Boxtrapper utility which is also available. Support options are available for professional assistance. You can return to our Index of Articles by clicking here.
How cPanel Spam Filters Score Incoming Email
cPanel spam filters offer a scoring a scoring system that evaluates every incoming email message. Each email is analysed for spam indicators like:
- suspicious wording
- forged headers
- missing SPF records
- whether incoming email is “whitelisted” by the targeted recipient
- unusual formatting and dozens of other signals
Each factor adds positive or negative points.
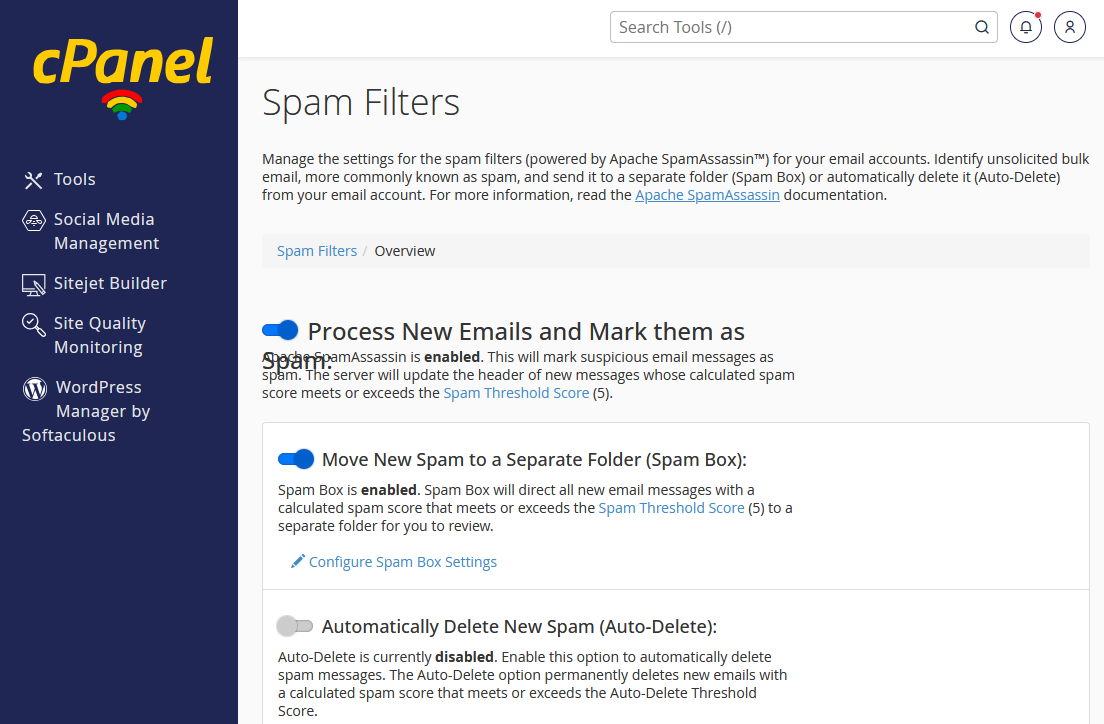
By default, your instance of SpamAssasin uses a default threshold of 5 when filtering is enabled. If the combined score of an email exceeds this value, the message is flagged as spam and is either moved to the Junk folder or discarded, depending on how the account is configured.
Because the calculation is cumulative, even legitimate emails can occasionally reach a high score—especially those containing marketing language, attachments, or forwarded content. This makes it important for users to tune cPanel spam filters to match their needs. Internet Service Providers (ISPs) for example, would relaxe their threshold to 8, to permit end users to allow their own servers to deal with arguable decisions.
rDNS, SPF, DKIM, and DMARC are all protocols that help “authenticate” valid emails. While email “just” works out of the box, without these services email that YOU send to others can be compromised because tools like SpamAssassin use these configurations to test email you send to recipients. These settings are often considered to be irrelevant by casual users because they are troublesome to implement and email seems to send when a user dispatches it. The problem is that if you send inadequately authenticated email, you usually do not know that it has been dropped by a spam filter. You can read more about authenticating your outgoing email in our article, Configure SPF, rDNS, DKIM, and DMARC for email.
Managing SpamAssassin Settings in cPanel
SpamAssassin is the default filtering engine in your cPanel environment, and it gives users fine‑grained control without requiring technical expertise. You can enable or disable the filter from the your cPanel home page in Email → Spam Filters panel.
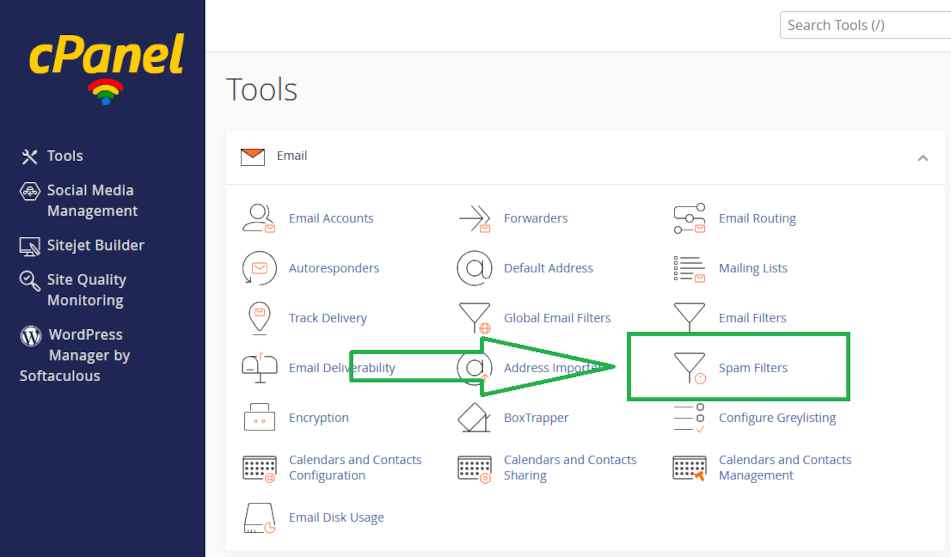
Open spam filters in your cPanel web server console
Adjusting the Spam Threshold
You will find a slider or a numerical box where you can adjust the spam score threshold in your Spam Filter preferences. Lower numbers make the filter more aggressive, while higher numbers reduce the chance of blocking legitimate emails. Users keep the threshold between 3 and 7, depending on how much mail they receive and how sensitive their workflow is.
The setting depends on your needs. Also, the setting needs periodic review. Above, we saw that ISPs use a more relaxed spam control of 8. Retailers, too, might need a more relaxed setting to accept orders from poorly authenticated email senders. In these sorts of situations, you would probably use locally implemented filtering to better target invoming email. For instance, a retailer might want to approve incoming email whose subject header or textual content matches “new order” or other metric.
Users typically configure their spam filtering like this – click open
Auto‑Delete and Spam Box
SpamAssassin also includes:
- Spam Box, which moves suspected spam into a special folder
- Auto‑Delete, which permanently removes messages over a certain score
- Whitelist and blacklist settings, allowing total control over trusted and untrusted senders
These optional tools give you more precision without requiring deeper configuration.
By adjusting these controls, you ensure that cPanel spam filters behave appropriately for your daily email habits.
SpamAssassin vs BoxTrapper: Which Is Better?
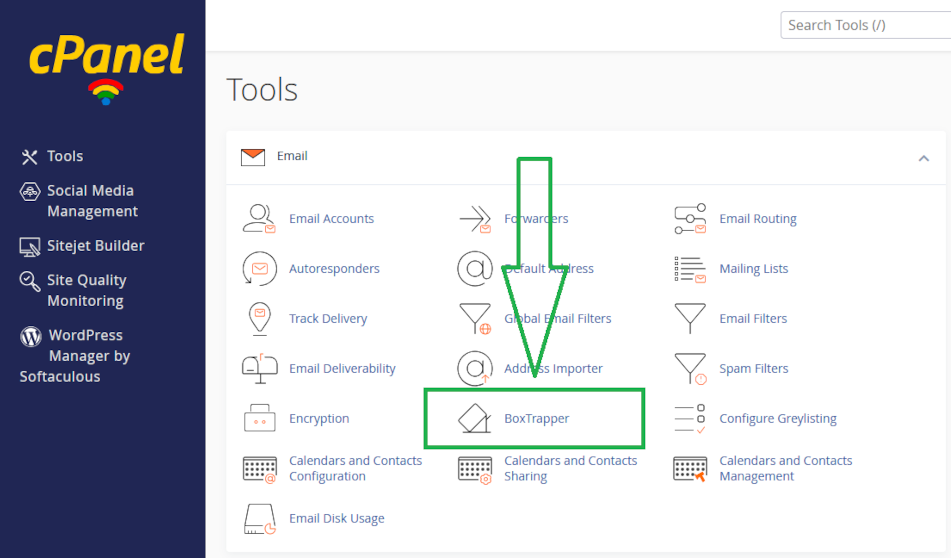
Your email server provides another spam filtering tool called BoxTrapper. The two solutions take different approaches to spam filtering.
SpamAssassin
- Uses an automated scoring system
- Requires no interaction from the sender
- Works quietly in the background
- Allows whitelisting and custom scoring rules
SpamAssassin is designed for ease of use and minimal disruption while still providing strong protection via its cPanel spam filters.
BoxTrapper
- Uses challenge–response verification
- Sends an automatic confirmation email to unfamiliar senders
- Requires the sender to take action before their message is delivered
- Filters nearly all spam because automated bots cannot confirm
BoxTrapper is far more aggressive than SpamAssassin. It is extremely effective—but at the cost of convenience. Some businesses and individuals avoid it because legitimate senders may ignore the confirmation request, leading to missed messages. You can find out more about BoxTrapper in this article.
For everyday users, cPanel spam filters based on SpamAssassin offer the right balance. For those facing severe spam issues and who can tolerate the extra step for new contacts, BoxTrapper provides nearly complete protection.
Summary
Most users will be well‑served by SpamAssassin’s flexible scoring system and simple management options. It provides reliable filtering via cPanel spam filters while allowing legitimate messages to pass through with minimal effort.
If you require near‑zero spam at the cost of extra friction for new senders, BoxTrapper may be the better choice. This would be desirable if you need to limit incoming email to known senders and you need to minimize the risk of phishing or other attempted attacks.
Both systems reflect the core strengths of cPanel spam filters, and understanding each helps you customise the best email experience for your needs.
If you need help configuring email, please get in touch, or use our contact page to organize an appointment which suits your timetable. You can return to our Index of Articles by clicking here .
How Outlook Categories Transform Email Management: A Simple Guide for Everyday Users
Introduction
Most Outlook users still rely on folders to store and manage their email. It’s familiar, and for small volumes of email it works well enough. But as your mailbox grows, folders start to break down. Messages fit into multiple topics, threads get split across separate folders, and it becomes harder to find what you need quickly. Outlook categories solve this problem.
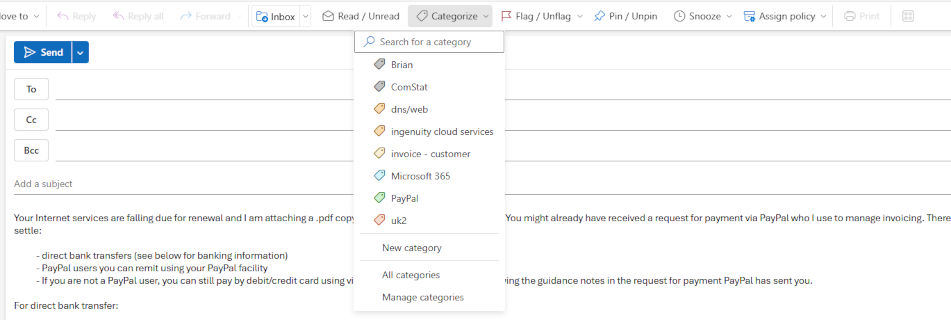
Outlook Categories turns your Inbox or Sent Items into a dynamic, instantly searchable workspace. Instead of dragging email into rigid folders, you add one or more coloured tags – i.e. Outlook Categories to an email. These tags make it possible to filter and group messages on the fly—exactly the way people already search the web using keywords, not folders.
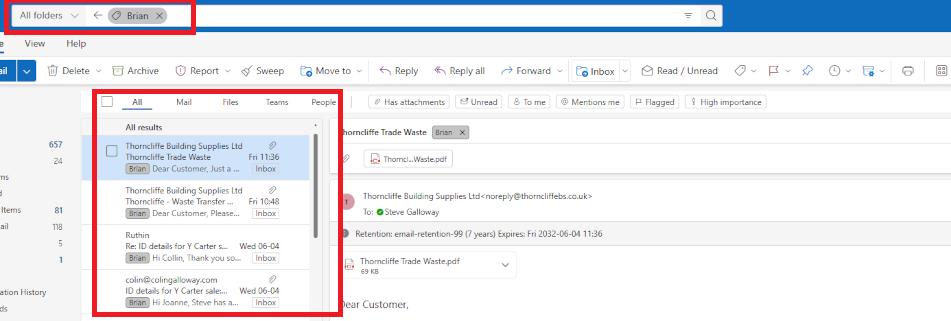
Enter the name of a category you want to filter in “search” and turn your Inbox into a dynamically generated folder which lists activty associated with your tag, e.g all items tagged with “Brian” in this screenshot.
Click open the headers below to learn more about Outlook Categories. You may also be interested in these associated articles.
Support options are available for professional assistance.For help planning a taxonomy that can be managed over time, please contact us.
Why Folders Don’t Scale
Folders are great for tidy filing cabinets, but email doesn’t behave like paperwork. Common problems include:
- Emails often belong to more than one folder. A message from a supplier might relate to two different projects. Which folder should it go in?
- Moving an email breaks the thread. If part of the conversation is in another folder, you lose context.
- Folder structures change over time. Projects evolve, businesses reorganise, priorities shift. Your folder tree becomes a maze.
As your mailbox grows, rigid storage (folders) become harder to maintain, not easier. This is why search engines like Google and Bing are so successful. We search by keyword (or category) and it works. So, we already use keywords every day to sort information. As your email volumes grow, keywords or categories become the logical way to rapidly find emails and threads.
Why Outlook Categories Work Better
Outlook Categories act like keywords or tags. An Outlook Category is a flexible, stackable, colour-coded label that help you recognise and organise email instantly. You can:
- apply multiple categories to a single email
- search or filter by category in seconds
- change categories without moving the message
- build dynamic, instant “views” of your Inbox
In other words, your Inbox becomes a smart workspace—no filing cabinet required.
Use categories to filter large Inboxes for emails tagged with a category to create a dynamic folder from your Inbox or Sent Items
Real Example: Tracking Deliveries Using Outlook Categories
Consider this scenario: at any one time we might have several outstanding orders from retailers or suppliers. If everything is delivered “next day”, that’s fine. Sometimes, though, a delivery may take weeks to despatch. We can put our Inbox to work to track deliveries using Outlook Categories to know what you have ordered and what has arrived.
Outlook Categories: example workflow setup
You need two categories (see this article to learn how to create a category):
- Outstanding (colour-coded, for items not yet received)
- Delivered (or “Complete”, for orders that have arrived)
Outlook Categories: track deliveries
This how the workflow looks once your categories are established:
- When you receive an order confirmation, apply the Outstanding category.
- When the goods arrive, change it to Delivered
- Use Outlook’s filter (i.e. Search) options to show only Outstanding emails when you want to check what you’re still waiting for.
- Switch filters to Delivered if you need to confirm what has arrived
Rather than using a tag called Delivered, you could call the tag Completed – this way you could use one tag to deal with other projects or tasks that are completed. This becomes an issue of planning and category management. When creating categories it is helpful to have a plan of how tags should be organised to make it easier to manage your “taxonomy” over time.
At their simplest level, Outlook Categories can manage individual recipients, groups, subjects/projects, and more.
To find out how to create an Outlook Category, see this article.
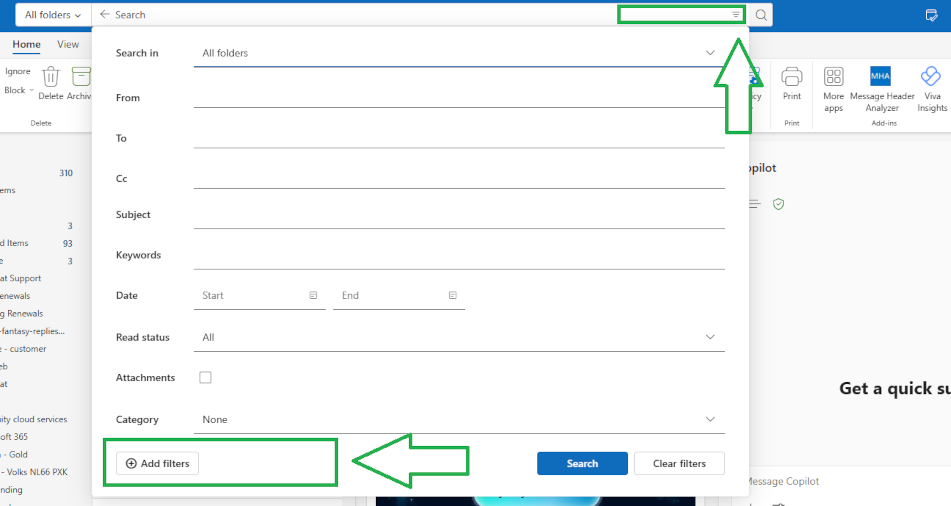
How to Filter Emails by Category
To bring fingertip power to Categories powerful, first add them to Outlook’s filter options in the Search utility.
- Go to your Inbox or Sent Items
- Click the Filter icon at the right of the Outlook Search field*
- Choose Add, More Filters or Search Tools → Advanced Find (depending on version).
- Add Categories as a filter field
Optionally, you can add Categories as their own field to make frequently used or topically important Categoires available in your Search drop-down.
*Hot Tip: the fliter icon does not appear by default inthe Outlook Search field. Instead, hover your mouse over the right side of your Search field to reveal the filter options icon.
Why Outlook Categories Beat Folders for Productivity
With Outlook Categories, you gain several long‑term advantages:
- Speed: Find what you need in seconds
- Flexibility: One email can have multiple categories
- Reduced clutter: Your folder list stays simple
- Consistency: Categories remain relevant even as your work changes
- Better search: Filters turn your Inbox into a powerful, dynamic dashboard
Most importantly, categories match how people already think. We tag photos, tag social media posts, tag documents—and we search the internet using tags or keywords. Categories simply bring that same modern approach to email.
Try Outlook Categories
If you struggle to keep on top of overflowing folders, or if you feel like you can never find the right message when you need it, give Outlook categories a try.
Start small with your Outstanding and Delivered tags, and once you see how much time you save, you can expand categories into other areas—projects, clients, personal admin, travel, invoices, support requests, and more.
Your email doesn’t need more folders. It needs better visibility. For large volumes, several emails can be selected (for instance in a folder) and categorised. However, with long established folder structures it mighjt not be practical to try to convert all emails to categories. Often, categories and folders co-exist. Folders become important in situations where a multiple users need access to a folder.
Lastly, note that categories are not easily assigned at an organizational level. So, if you work within an organizational group, it makes sense to establish a policy that colleagues can conform to.
About ComStat.uk: Internet Service Provider Comstat provides IT support, web hosting, and media services including website design, Microsoft 365 setup, and audio/video production, serving businesses across Denbighshire, North Wales and Wirral from Ruthin, and Lancashire and the Northwest from Bolton.

OneNote Sync Troubleshooting: Fixing Missing Sections and Notebook Conflicts on Android
Case Study: OneNote Sync Troubleshooting
When OneNote works well, it offers a seamless experience across devices: imagine having your post-it notes: searchable, everywhere you go. Sometimes sync issues appear without warning, though. This case study explains a real example of OneNote sync troubleshooting where a user found that some notebook sections were missing on Android, Quick Notes were not syncing correctly, and another notebook caused unexpected behaviour.
This guide shows what happened, why it happened, and how a simple OneNote sync troubleshooting fix restored proper synchronisation across desktop, web, and mobile devices. This article uses an Android deployment as an example, and a workflow is included in *** explaining how to resolve OneNote sync in Apple iOS in section <How to reset OneNote for mobile sync> below.
Click open the headers below to learn more about keeping OneNote firing on all cylinders.
You can return to our Index of Articles by clicking here.
OneNote sync symptoms
The issue arose when a user noticed that the 2026 section of their notebook was visible on OneNote for Windows desktop and OneNote for the web, but the 2026 section did not appear on OneNote Mobile for Android. The older sections (2022–2025) appeared normally, and Quick Notes worked on desktop, but new Quick Notes did not show up in the correct place on mobile.
The user colour-coded his sections so that the current year is always coloured green. However, on his Android phone, last year’s section – 2025 – was coloured green. On his desktop and web notebook instances, 2025 was coloured grey and 2026 was green. This turned out to be instructructive as we will see later.
So, only part of the notebook structure was syncing, and section colours on Android mobile did not match the desktop or web versions. Partial mismatches are a classic signal that OneNote Mobile has cached an outdated version of the notebook.
At the same time, the user noticed a second notebook on his mobile. Let’s call this “Charlie’s Notebook.” This notebook was not open in Charlie’s desktop version, yet OneNote app on Charlie’s Android treated it as the default notebook on his mobile phone. This meant a feature called Quick Notes that were created on the phone were silently routed into Charlie’s Notebook whch the user never used, instead of the main M365 notebook where our user keeps all his client meeting notes in a date ordered journal. This meant that notes created in his desktop “Quick Notes” did not sync to the expected location on his mobile phone – instead, the “quick notes” were routing to Charlie’s notebook too.
This combination of missing sections, mismatched colours, and a phantom notebook is a common pattern addressed through OneNote sync troubleshooting. It is easily fixed – when you know how.
Click open the next section to find out more about fixing this OneNote sync problem.
Root Cause: A Cached Notebook Structure on Android
OneNote Mobile caches each notebook’s structure when it is first opened. It continues to use that cached structure until the app is forced to refresh it. Even when new sections are added on desktop or web, Android may not notice new sections unless the OneNote cache on the Android handset is fully cleared.
In this case, the “Charlie’s Notebook” entry was an old OneDrive notebook created years earlier when the user first setup OneNote. Android had continued treating it as the default notebook. The result was:
- Quick Notes were sent to the wrong notebook
- New sections like 2026 never appeared
- Notebook colours stayed out of date
- Recent Notes showed pages from two different notebooks
All of this pointed toward a stale cached notebook that needed a proper reset.
The Fix: Resetting OneNote’s Data on Android
The correct solution for this type of OneNote sync troubleshooting is not reinstalling the app, but clearing its cached notebook data through Android’s app settings. This approach forces OneNote Mobile to:
- Forget all cached notebook versions
- Re-download the correct structure from SharePoint
- Rebuild section lists and colours
- Refresh the default notebook
- Drop any old notebooks that should no longer sync
How to reset OneNote for mobile sync
This workflow was performed on Android 12. The steps might vary from device to device, but the process is similar. For Apple iOS devices, see 2. Apple iOS below.
1. Android
- Open Android Settings
- Go to Apps
- Choose OneNote
- Open Storage & Cache
- Tap Clear Storage
- relaunch OneNote and sign in again if asked
- Reopen only your principle notebook
- do not open other notebooks
2. Apple iOS
iOS does not offer a “Clear data/cache” button like Android. So, to achieve the same result:
- Remove the app (or offload it), which deletes local data.
- Reinstall the app, which causes OneNote to rebuild its notebook list and download fresh copies from the cloud.
Once your mobile app downloads a fresh notebook structure, sections and notes will sync properly. Check for icon and colour-coding behaviours and compare to your OneNote desktop installation. Now, all Quick Notes (automatically installed when a notebook is created) will sync across desktop, web, and mobile exactly as expected. Test this by creating a test note in Quick Notes
Summary
The important point here is that when a notebook has changed significantly on OneNote desktop or Web, Android and Apple may need a full cache reset to see the updated structure.
This problem is not uncommon. Unfortunately, users often shrug their shoulders when this kind of sync fails and OneNote loses its utility as. Not unreasonably, users are not sure where to look for the problem or even what the problem is. Happily, functionality is easily fixed and this article should help you understand that OneNote caches on mobile devices can be easily remedied.
If you would like help exploring OneNote features implementing OneNote across devices, feel free to get in touch, or use out contact page to organize an appointment which suits your timetable. You can return to our Index of Articles by clicking here.